BEmail ( Email-2-Campaign )
From All n One's bxp software Wixi
Contents
1 Overview
| Setup | Content Continue | Content Retrieval | Content Replacement | onArrival | SPAM |
|---|---|---|---|---|---|
| Link | Link | Link | Link | Link | Link |
Electronic Mail or eMail is a very powerful communication tool. Leveraging its power is something bxp makes very easy. Whether that email is scheduled contact or ways of instantly interacting with customers, bxp can make the business processes of reacting and being proactive so much easier.
The primary engine in bxp for dealing and interacting with inbound email is the Email-2-Campaign engine.
An email arrives into a traditional inbox. Instead of using a tool like Outlook to log in and view your emails, bxp logs into the inbox. It then hoovers the email out and turns it into a data record. Now that it is a data record the processes controlling what happens can be very structured. Unlike a gmail inbox or outlook inbox where rules and processing order are very hard to control.
This article covers a number of areas including setup and configuration of this engine.
2 Uses
- Work distribution / Group mailbox : Once the emails are converted to records then can then be managed in a number of ways Form_-_Record_ownership_strategies
- Social Media management : CC-3-4_Mailbox_and_Social_Media_integration
- Support desk : Bxp_and_Case_Management_-_Worked_Scenario
3 Technical Setup
3.1 Step 1. Choose / Create the mailbox to be used
This is done using an email host provider. It is nothing to do with bxp. If you need a hand getting sorted with an email account the All n One support will be glad to provide a number of reference companies suitable to your situation. Gmail and other free hosting providers are a potential solution as well as corporate email.
The core need is that bxp is be able to access the mailbox. For company internal email solutions this can pose a number of challenges. For publicly hosted solutions this is never an issue.
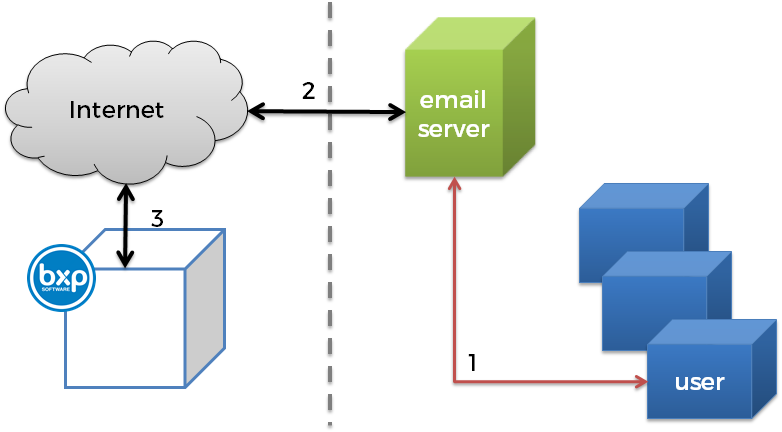
- A user inside the organisation can access the email server (1).
- The email server can chat to the internet. The controls on that Internet all emails to be delivered in only from the Internet (i.e. Internet into Server through the firewall (vertical grey dashed lined) (2).
- For security, people are prevented from viewing their emails from the Internet side. This vastly increases security and reduces the risk of hacking into email accounts.
bxp however needs to log into the email box to retrieve the emails. This is where the challenge lies.
3.1.1 Dealing with Internal email server setups
There are generally two approaches the IT department can take.
Solution A. Forwarding.
When an email comes into the mailbox inside the firewall, the email account is set up to forward the email to an external mailbox that is accessible on the Internet. bxp logs into the publicly accessible account.
Solution B. Restricted access through the firewall.
bxp's static IP addresses are configured on the firewall to be allowed through. It doesn't open up the connection to the world only just for bxp. This can be acceptable to some IT departments.
3.2 Step 2. Set up the mailbox in bxp, so that bxp can get into the account
Mailbox management is covered in BEMail_accounts.
For the purposes of building up a worked example, we assume we configure an account to access demonstration@allnone.ie correctly in SAM.
!!Warning!! - Do NOT set up this the mailbox reader on your personal account, especially if you use IMAP4. As part of the process bxp deletes an email as soon as it turns it into a record.
3.3 Step 3. Set up the form to access that mailbox
There are two aspects to setting up the retrieval. The fields in the form which will store the information and configuring the form to retrieve the emails.
3.3.1 Setting up the fields in the form
Create a form Main Menu > Form Management > Form - Primary Management > Form - Create > Choose Blended and give your form a name For this worked demo we'll call the form "Demo - Mailbox Management"
Choose "Question Addtion" from the console on the left hand side.
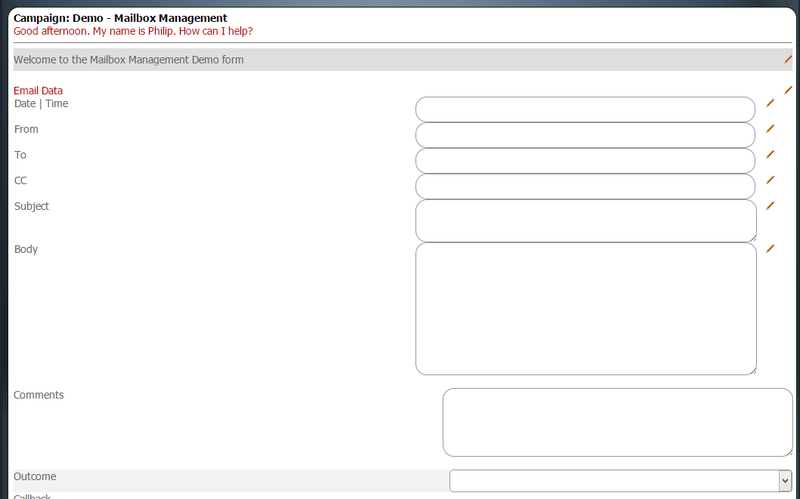
In the Question Type choose "Complex - BEmail Block (DateTime, From, To, CC, Subject, Body)" and put "Email Data" in the question. Click "Add Question". When ready click "Review the build". It should look like:
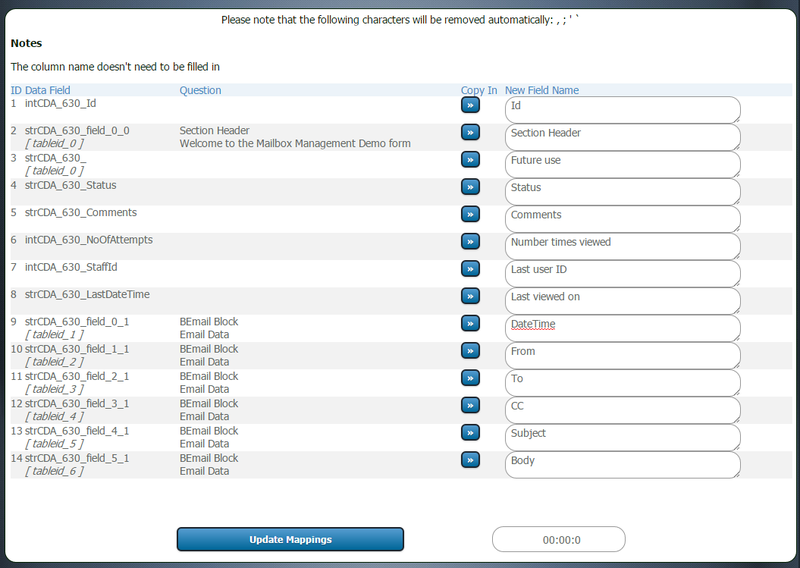
The next step is to update the Field Mapping of the form. So each field needs to be named properly from New to DateTime, From, To, CC, Subject, Body.
We now have enough storage space to store everything that would come in from an email.
3.3.2 Configuring the form to retrieve the email
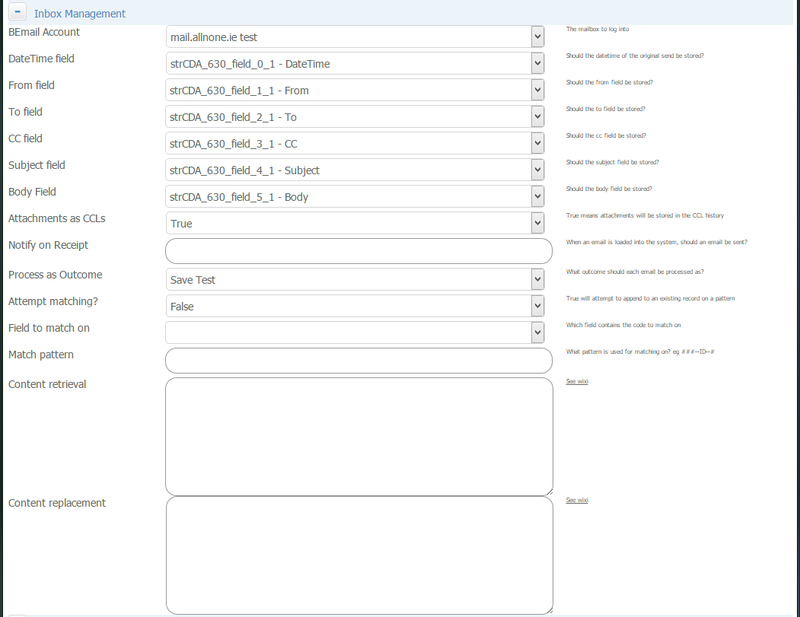
Now we need to get the form to retrieve the details. This is done through the Advanced Settings of the form. Main Menu > Form Management > Form - Primary Management > Form - Advanced settings > Choose the form > Inbox Management >
- BEmail Account: This is the account created in Step 1.
- DateTime field : The date time from the email header is stored in this selected field.
- From field : The full From details of the email are to be stored in this selected field.
- To field : The full To details of the email are to be stored in this selected field.
- CC field : The full CC details of the email are to be stored in this selected field.
- Subject field : The Subject of the email is to be stored in this selected field.
- Body Field : The Body of the email is to be stored in this selected field.
3.3.3 Advanced configuration options
Beyond just basic email retrieval bxp can also perform further actions when emails are retrieved.
- Attachments as CCLs : Should attachments be stored as well? If true, attachments are available through the Contact History button
- Notify on Receipt : Will send an email to this named email address(s) when a new email has been converted to a record. Handy for people not logged into bxp all the time.
- Process as Outcome : Which outcome to execute as an email is stored. We set it to the default Save Test for this worked example.
As an extra touch, scroll up and we turn on the Advanced Options > "Record Move Next Bar" to true. This allows us to better navigate the records whilst testing.
Go to the bottom and "Update" the form
3.4 Step 4. Test it
Send an email from your own account to the testing email box chosen in Step 1. Ensure that you put data in all the fields including the To, CC, Subject and Body. Send the email and check you've hit Send / Receive if you're using Outlook to ensure the email has sent.
Now, to retrieve the emails from that account into the form Main Menu > Form Management > Form - Data Import > Load Data Records - Retrieve Email-2-Form > Choose the form > It may take a few seconds to download the emails. In the example below no emails were found. This number changes depending on the amount retrieved.
Please note that this email will actively delete emails from the in-box as soon as they're turned into data records, to ensure no duplication of records.
Use the link "See last returned email" to jump to the form. You should be presented with the test email you sent in.
4 Next Steps
There are many configuration options and tweaks you may like to explore with this process. Please contact us in support for further ideas on :
| Setup | Content Continue | Content Retrieval | Content Replacement | onArrival | SPAM |
|---|---|---|---|---|---|
| Link | Link | Link | Link | Link | Link |
- Enabling a customer to reply to emails and that going straight into a continuing record (Content Continue)
- Setting up spam filters (SPAM Management)
- Classifying records to set importance for outbound contact processing (Content Retrieval and onArrival)
- Managing attachments and other document management strategies through email (Content Retrieval)


