Bxp - Worklists
From All n One's bxp software Wixi
Contents
- 1 Overview
- 2 Background
- 3 Initial Form Build
- 4 Initial Worklist Build - Worked example 1
- 5 Control Bar links to Worklists
- 6 Using the worklist
- 7 Worklist Update - Worked example 2
- 8 Worked example 3 - Setup a personalised worklist
- 9 Dynamic Parameters - QueryString parameters
- 10 Customising the interface to use Worklists
1 Overview
In bxp software (bxp) there are many ways to display data. One of the most powerful of these is a Worklist.
A worklist is the equivalent of a tick box exercise, i.e. when the work is done, it disappears from the list. Except instead of a tick, you go into the record, choose an outcome which triggers the removal of the item.
Worklists at their core are a report with very specific parameters. Another example is a filtered Excel spreadsheet showing only records to be worked on.
Worklists are developed and set up through the Data Profiling module ![]()
The versatility of worklists lies in the fact that they can be re-purposed very easily. Again, as an example, changing the filters in an Excel spreadsheet is very simple to do.
2 Background
As Cross Linked report allows for parent – child relationship records to be displayed, a WorkList is a variation on this theme. It allows a selection of records to be displayed with a view to each record being clickable. This report is used in scenarios such as
- Case Management: List all the tickets that are assigned to me
- HR Management: List all staff records in a particular department
- Contact Management: List all records that are currently escalated and need review.
As a worklist report is a daily tool or a link to other reports. e.g. https://ww3.allnone.ie/client/client_demo/main/rptWorklist.asp
A number of parameters are passed to it, namely the ID of the Campaign Group which is holding the Worklist settings. So if our Custom Group had an ID of 14 the URL would be.
https://ww3.allnone.ie/client/client_demo/main/rptWorklist.asp?ID=14
As this is not easy to remember, the system is able to create an easy to use button on your Main Menu to make it a single click exercise. The URL can also be used in eCourse Assets and other dynamically created parts of the system.
There is also a dedicated Worklist interface bar to allow worklists to be displayed on every single page of the system. It has an Id of 16. For more details see Interface_Bars
The easiest way of building a worklist is to create your report as normal. Ensure that the data output of the report is exactly what you’d expect to see in a worklist. Then double check that the contents of your report change as new records are added by generating the report again, and ensuring your reporting criteria is correct.
The easiest way of testing a Worklist is:
- Main Menu > Data Profiling > Instant – Dashboards > Control Bar Button – Worklist > Choose your form > Choose your Custom Group > The Control Bar options are presented to allow you create the button
- Give the link a unique name to help you identify it for yourself
- Create the Link
- From the Main Menu find your new link under “Personal”
From within your worklist you should be able to click the records to work on.
If you have any challenges in setting up and configuring these reports please feel free to contact us at support@bxpsoftware.com
3 Initial Form Build
For the worked example we start with a form which is a simple To Do List. Building a form is covered in CC-1-3 available from Contact_Centre_Training
The form has four questions. Persons name (text box), Work complete (yes/no) Subject (text box) and Description (text area). We do the field mapping on the form as well.
Into this form we put a number of tasks to be done as simple examples:
- Philip Lacey | No | Write Wixi Article | A full write up on Worklist reports
- Philip Lacey | No | Write Wixi Scenario | Create a scenario to demonstrate how useful bxp is for many situations
- Philip Lacey | No | Perform Security Checks | Perform 4 weekly security checks and send results back to the Security department
We now have enough information to create a meaningful worklist.
Thinking of the situation, there are a number of worklists which might be useful
- Worked example 1 : List all To Do items where Work Complete is No
- Worked example 2 : List all To Do items where Work Complete is Yes
- Worked example 3 : List all To Do items where Persons Name is Philip Lacey and Work Complete is No
4 Initial Worklist Build - Worked example 1
Lets build the first worklist. As mentioned at the outset a work list at its core is a report. Worklists are formed from Customised Groups. CC-2-4 Data Profiling - Custom reporting (CC) available from Contact_Centre_Training covers Customised Group reports in detail.
In summary... Main Menu > Data Profiling > Customised - Group Management > Group - Create >
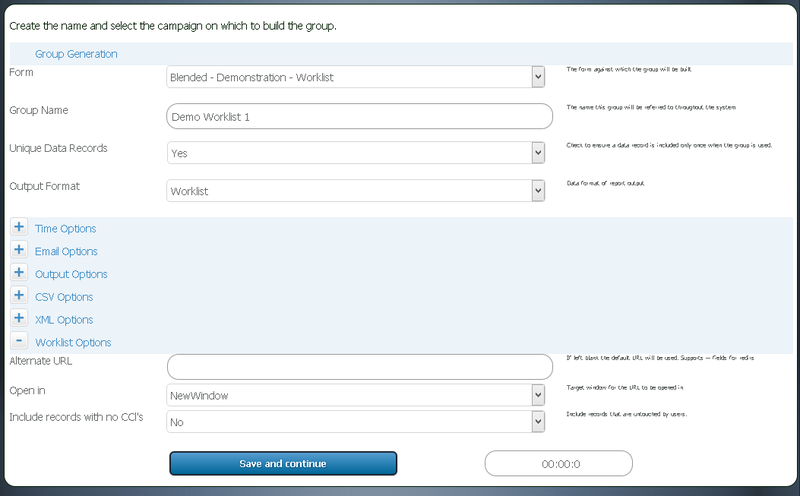
Group Generation :
- Form : Choose the form created above
- Group Name : Demo Worklist 1
- Unique Data Records : Yes. We want to only ever had a work item appear once in the list. If no, CCLs can cause work list items to repeat.
- Output Format : Worklist.
- Click "Save and Continue".
- Don't choose any users from the next screen, as we don't need to limit who's interacted with the items for this work list. Go to the bottom and click "Continue"
- We need to choose All outcomes from the next screen, so click "Select All" and then click "Save and continue".
- Now we need to inlcude the fields to display in our worklist. So for this we only put a tick beside "Persons Name" and "Subject", then click "Save and Continue"
If you want to sort / order the data in your worklist, simply add the fields at the top of this page, separated by commas and the sorting will be applied.
- Next screen click "Save and continue"
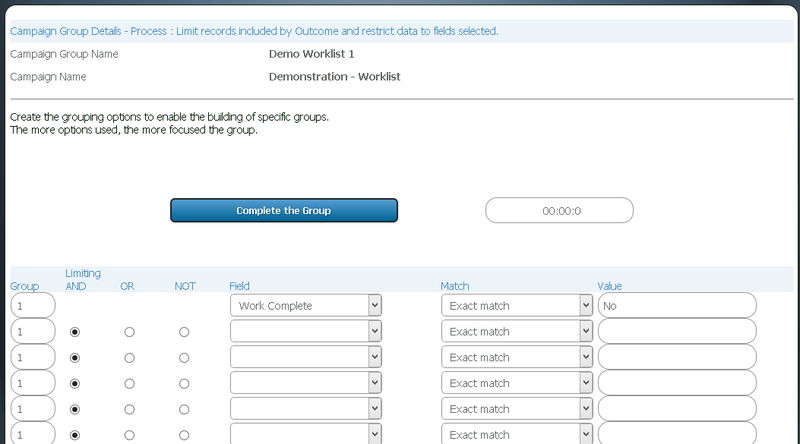
- The final screen is where we put the limitations for the work list. So the first worked example is "Work Complete" is an exact match to "No"
5 Control Bar links to Worklists
We now have the engine for our worklist completed. We now just need to make the worklist easy to get to. It is impractical to have the report buried in Data Profiling if the worklist is to be used on a frequent / regular basis. For this reason implementing it as a Control Bar button on the Main Menu is the general starting position.
To do this Main Menu > Data Profiling > Instant - Dashboards > Control Bar Button - Work List > Choose the form > which gives you a choice. A Personal link is just for your account. A Public link is for many users to access the work list. We'll start with "Personal" as an example.
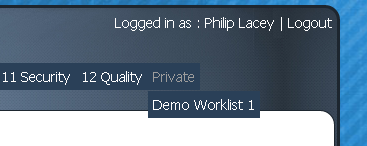
You can leave all the settings as they are, scroll to the bottom and click "Create the Link". When you are finished go back to the Main Menu. There should be a new menu item in Private called "Demo Worklist 1".
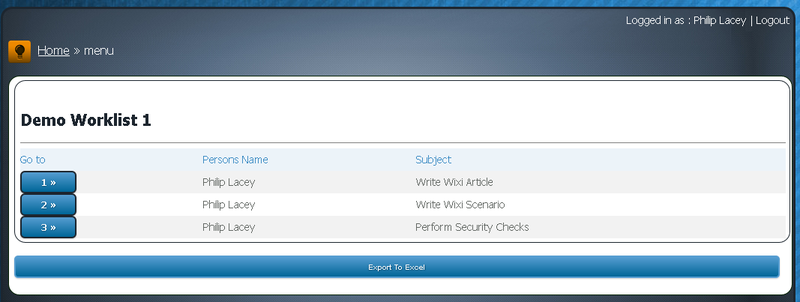
Clicking the link should result in our worklist
6 Using the worklist
Clicking any button takes you through to the record to continue working with it. To show the work list is working, we are going to click through on record 2 which is "Write Wixi Scenario". In that record, we then set the "Work complete" to Yes, choose the "Save Test" outcome and click "Save Details".
Going back to the Main Menu and into the link again... now you can see the work list has reduced.
7 Worklist Update - Worked example 2
For our second Worked example 2 "List all To Do items where Work Complete is Yes", we modify the grouping parameters. Main Menu > Data Profiling > Customised - Group Management > Group - Edit Grouping Parameters > Choose the form > Choose the Custom Group > " Now we change value from "No" to "Yes"
The worklist now becomes
8 Worked example 3 - Setup a personalised worklist
The next challenge is when we put more than just Philip Lacey into the list of people. So we add three more records, this time work items for Nick Wheeler.
- Nick Wheeler | No | Sales Presentation to Client 1 | Client 1 has called us in to do a presentation as they're really interested
- Nick Wheeler | No | Follow up with Client 2 | Send out the required case study and requested further information on Worklists
- Nick Wheeler | No | Send contract to Client 3 | Send out the paperwork to Client 3 as they want to sign up.
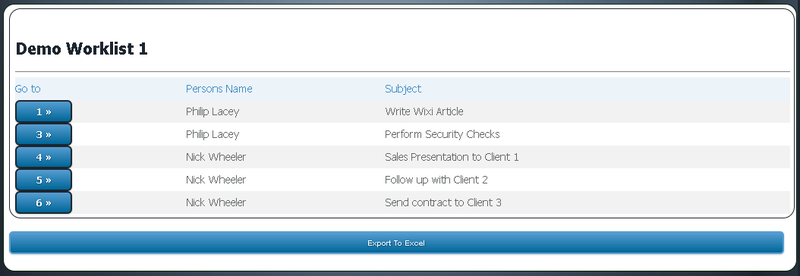
However when we now use our worklist it is not personalised just for one person
For this reason we go back to the Custom Group parameters as discussed earlier and we add in a second level of refinement and reset the "Work Complete" back to "No"
The worklist now becomes
9 Dynamic Parameters - QueryString parameters
Creating a work list for each person would be impractical. There are dynamic parameters possible which allow for customisations. The first example is through the QueryString.
Earlier we created a personal worklist control bar link. We are going to pass information through this link. Which means that as you create numerous links we can customise the links.
Firstly we let the worklist know that it needs to look for a customised value. This begins the usage of the -- Notation The_--_field_notation_for_bxp_Forms. Into the parameter we add --strAgent-- instead of the persons name.
Now we can customise the URLs and allow them to pass information.
Main Menu > Control Bar > Personal Links > Edit a link > Choose your Personal Link >
We update the link and then use it
As can be seen in the URL, the strAgent = Philip Lacey. In URLs spaces are converted to %20. To show the dynamism of the link, change the "Philip Lacey" to "Nick Wheeler", press return and the worklist will change appropriately.
This is a simple example. There are many further options, configurations and tweaks possible.
10 Customising the interface to use Worklists
It is possible to integrate worklists into the Main Menu of user to make the worklists even more immediately available.
Taking a standard configuration for the Main Menu of 17,22,25,2,7,4,18,13,19,5,26 Interface_Bars
The interface bar for a worklist is 16. We need to get the unique ID of the worklist. Main Menu > Data Profiling > Customised - Group Management > Group - Edit Primary Details > Choose the form > On the next screen the ID for the Worklists is written beside each worklist. In this example system the Id is 155.
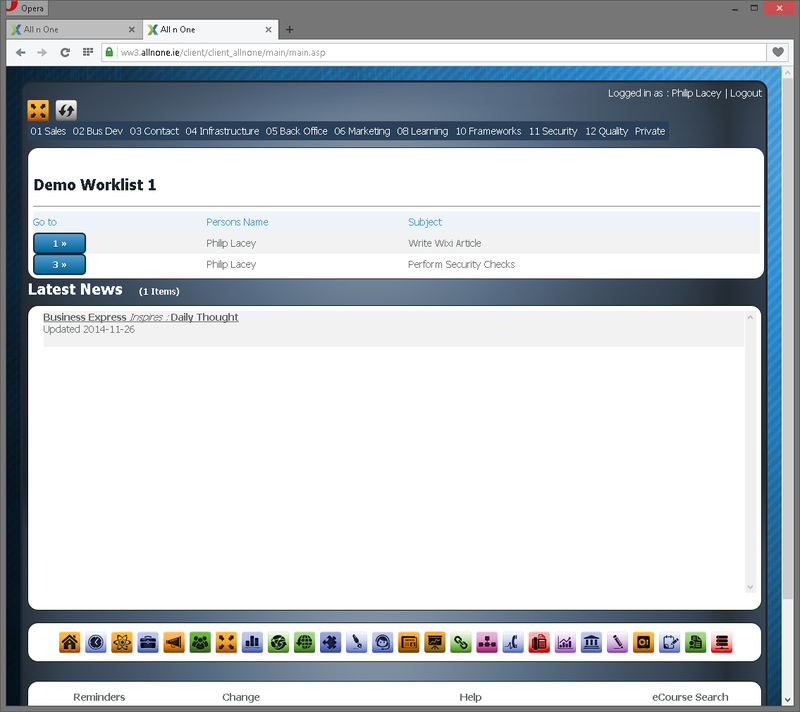
So for this, we add in the worklist to the paramters using 16-155 to denote a worklist with an Id of 155. The new listing becomes 17,22,25,2,7,4,18,16-155,13,19,5,26
To change the configuration, go to the I Want To bar at the bottom of the screen, click "My Details" find Interfacte Options > Main Menu and paste in the new list. As can be seen below, the worklist becomes integrated into the Main Menu.
10.1 Auto Refreshing Worklist
bxp worklists now have the ability to auto refresh, at a user defined refresh rate. When creating a worklist quick link you need to add an additional Query String parameter to the URL.
This Query String parameter is intRefreshRate, to use the auto refresh functionality this Query String parameter must be in the URL (Example Below - with reference to the above example)
The above example will create a quick link to a worklist that has been created. When the worklist renders to screen it will automatically refresh every 5000 Milliseconds (5 Seconds).
When using the auto refresh functionality you must reference the refresh rate in Milliseconds, here are some helpful conversions
Hours
02 - 7200000
01 - 3600000
Example: ''Refresh Every 2 hours''

https://ww3.allnone.ie/client/client_SYSTEMNAME/main/rptWorklist.asp?ID=WorkListId&intRefreshRate=7200000
Minutes
45 - 2700000
30 - 1800000
20 - 1200000
15 - 900000
10 - 600000
05 - 300000
Example: ''Refresh Every 45 Minutes''

https://ww3.allnone.ie/client/client_SYSTEMNAME/main/rptWorklist.asp?ID=WorkListId&intRefreshRate=2700000
Seconds
30 - 30000
15 - 15000
Example: ''Refresh Every 30 Seconds''

https://ww3.allnone.ie/client/client_SYSTEMNAME/main/rptWorklist.asp?ID=WorkListId&intRefreshRate=30000


