Report Library - Scheduled Reporting
Contents
1 Overview
Due to the expansion of the bxp scheduling engine, bxp now allows for the creation of scheduled reports. This article will show you how to create a scheduled report, update an existing scheduled report and then access/download the reports generated by the bxp scheduling engine.
There are however three conditions that must be met before you can schedule a report, bxp will not allow scheduled reporting if the following three cases:
- The report to be scheduled is not a customised group
- The required reporting time from is set to start in the past
- The required report generate time is between 23:00 and 07:00 ( this time is set aside for the bxp backup and maintenance scheduled routines )
2 Creating a scheduled report
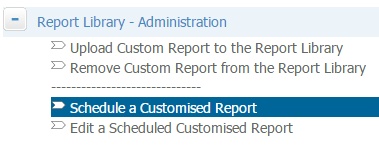
In order to schedule a report inside bxp you must first navigate the following system path
Main Menu > Report Library > Report Library - Administration > Schedule a Customised Report
Once you have navigated the above system path you will be presented with a List of all the forms in the system that you have access to. You must chose a form to generate the report against,
After selecting the desired form you will be redirected to the Scheduled Report page.
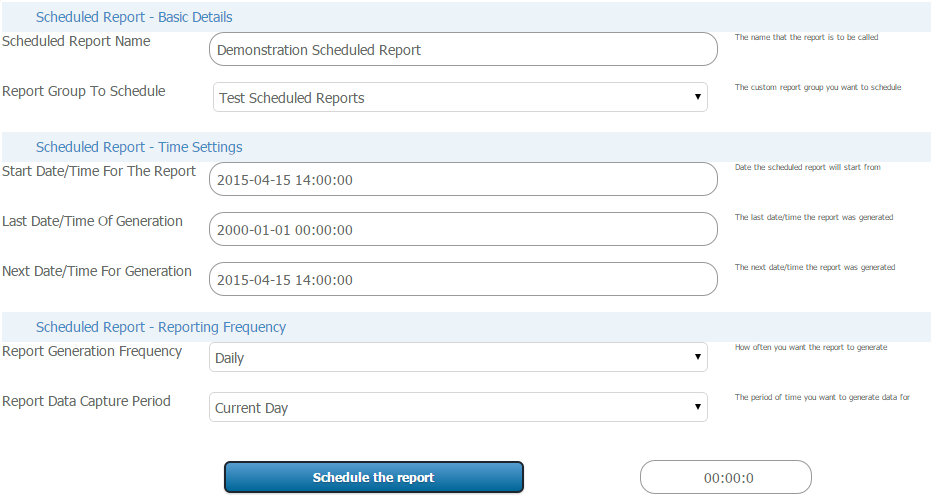
Once here you will have a number of options on screen, you must fill in the entire form as instructed below to ensure you have scheduled the customised report correctly. The fields on the form
are as follows:
- Scheduled Report Name : This field should contain a unique identifiable name for the report you wish to schedule
- Report Group To Schedule : This field should be the customised reporting group that you wish to use when generating the data
- Start Date/Time For The Report : This field should contain the date and time you wish for the scheduled report generation to start
- Last Date/Time Of Generation : This field is system controlled and contains the last date and time the scheduled report was generated
- Next Date/Time For Generation : This field is system controlled and contains the next date and time the scheduled report is due to generate
- Report Generation Frequency : This field should contain the desired reporting frequency i.e. How ofter do you want the scheduled report to generate. There are five frequencies available
- Daily ( Generate once every day )
- Weekly ( Generate once every 7 Days )
- Monthly ( Generate once every Month )
- Yearly ( Generate once every Year )
- Hourly ( Generate once every hour )
- Report Data Capture Period : This field should contain the date range option that you wish to include data from in you scheduled report, there are four date ranges available
- All ( Include All Data )
- Current Year ( Include data from the current Year )
- Current Month ( Include data from the current Month )
- Current Day ( Include data from the current Day )
- MetaData Delta ( Include all new data i.e. Data capture between the last time the scheduled report was generated and the current execution )
3 Editing a Scheduled Report
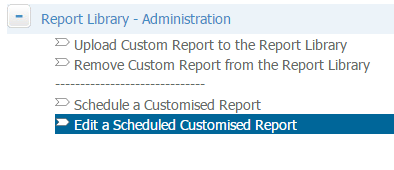
In order to edit a scheduled report inside bxp you must first navigate the following system path
Main Menu > Report Library > Report Library - Administration > Edit a Scheduled Customised Report
Once you have navigated the above system path you will be presented with a List of all the forms in the system that you have access to. You must chose the form that the
existing scheduled report is attached to, after doing this you will be presented with a list of all the scheduled reports attached to the selected form. Simply select the scheduled
report that you wish to modify and click the Select button at the bottom of the page:
After selecting the scheduled report that you wish to modify, you will be presented with the Edit a Scheduled Report Page, this page has the exact same layout and fields as the Add a Scheduled Report Page except that all of the fields are pre populated with the current settings. Simply make your changes to the scheduled report settings and click the Schedule the report button
4 Accessing/Downloading a Scheduled Report
In order to access and download a scheduled report you must navigate the following system path
Main Menu > Report Library > Report Library
Once you have navigated the above system path you will be presented with a list of all the forms in the system that you have access to. You must choose a form to view all of the scheduled reports for, After doing this you will be presented with a list of all the scheduled report output files that have currently been generated. If you wish to download one of these output files, simply click on the Secure Download icon located to the right hand side of each file to be downloaded.
5 Alternate Method for Scheduling Reports
If you wish to schedule reports in the system but you dont want to use the front end of bxp to manage it, you can use the standard windows task scheduler on you PC. To do this simply follow the step by step guide in the below document


