Difference between revisions of "Outbound - Queue Management"
From All n One's bxp software Wixi
Philip Lacey (talk | contribs) |
Philip Lacey (talk | contribs) |
||
| Line 130: | Line 130: | ||
== Set the current working outcome == | == Set the current working outcome == | ||
| + | |||
| + | |||
| + | For outbound : ''Main Menu > Outbound Contact > Queue Management > Set Current Working Outcome'' | ||
| + | For case management : ''Main Menu > Case Management > Queue Management > Set Current Working Outcome'' | ||
| + | |||
* Here you can choose the current set of records to be managed. | * Here you can choose the current set of records to be managed. | ||
| − | * Choose the | + | * Choose the form |
| Line 151: | Line 156: | ||
== Set the Current working outcome by Period == | == Set the Current working outcome by Period == | ||
| + | |||
| + | |||
| + | For outbound : ''Main Menu > Outbound Contact > Queue Management > Set Current Working Outcome by Period'' | ||
| + | For case management : ''Main Menu > Case Management > Queue Management > Set Current Working Outcome by Period'' | ||
| + | |||
* Here you can choose the current set of records to be managed during a certain period of time. | * Here you can choose the current set of records to be managed during a certain period of time. | ||
* Choose the dates. | * Choose the dates. | ||
| − | * Choose the | + | * Choose the form. |
The following will be displayed on the screen: | The following will be displayed on the screen: | ||
| Line 172: | Line 182: | ||
== Create custom contact group == | == Create custom contact group == | ||
| − | * Select the | + | |
| + | For outbound : ''Main Menu > Outbound Contact > Queue Management > Create custom contact group'' | ||
| + | For case management : ''Main Menu > Case Management > Queue Management > Create custom contact group'' | ||
| + | |||
| + | |||
| + | * Select the form. | ||
* Create a name for this group in the text box. | * Create a name for this group in the text box. | ||
* By supplying a name, this query group can be accessed quickly in the future. | * By supplying a name, this query group can be accessed quickly in the future. | ||
| Line 184: | Line 199: | ||
== Reset Contact History == | == Reset Contact History == | ||
| − | * Choose the | + | |
| + | |||
| + | For outbound : ''Main Menu > Outbound Contact > Queue Management > Reset Contact History'' | ||
| + | For case management : ''Main Menu > Case Management > Queue Management > Reset Contact History'' | ||
| + | |||
| + | |||
| + | * Choose the form. | ||
* You must be sure you wish to reset the contact attempts and last status. | * You must be sure you wish to reset the contact attempts and last status. | ||
* This action is irreversible once started. | * This action is irreversible once started. | ||
| Line 194: | Line 215: | ||
== View contact queue == | == View contact queue == | ||
| − | * Choose the | + | |
| + | For outbound : ''Main Menu > Outbound Contact > Queue Management > View contact queue'' | ||
| + | For case management : ''Main Menu > Case Management > Queue Management > View contact queue'' | ||
| + | |||
| + | |||
| + | * Choose the form. | ||
* The client record queue will be displayed. | * The client record queue will be displayed. | ||
* The following will be displayed on the screen: | * The following will be displayed on the screen: | ||
| Line 206: | Line 232: | ||
== Add to contact queue == | == Add to contact queue == | ||
| − | * Choose the | + | |
| + | For outbound : ''Main Menu > Outbound Contact > Queue Management > Add to contact queue'' | ||
| + | For case management : ''Main Menu > Case Management > Queue Management > Add to contact queue'' | ||
| + | |||
| + | |||
| + | * Choose the form. | ||
* Add outcomes to the contact queue. | * Add outcomes to the contact queue. | ||
* The following will be displayed on the screen: | * The following will be displayed on the screen: | ||
| Line 221: | Line 252: | ||
== Clear contact queue == | == Clear contact queue == | ||
| − | * Choose a | + | |
| − | * Be sure that you want to clear the queue for this | + | For outbound : ''Main Menu > Outbound Contact > Queue Management > Clear contact queue'' |
| + | For case management : ''Main Menu > Case Management > Queue Management > Clear contact queue'' | ||
| + | |||
| + | |||
| + | * Choose a form. | ||
| + | * Be sure that you want to clear the queue for this form. | ||
* Confirm queue reset. | * Confirm queue reset. | ||
* Reset queue. | * Reset queue. | ||
Latest revision as of 13:09, 10 December 2014
1 The Concepts
In bxp software (bxp) an outbound campaign is the process of working through records one after the other, to achieve the campaign goal. There is a distribution engine in bxp which enables those records to be given out in a controlled manner. Queue Management is the collective term given to the management of this process.
Full formal training documentation is available in CC-2-3 Outbound contact management from Contact_Centre_Training
2 Lexicon
There are a lot of terms used in connection with outbound campaigns. These terms are now presented in the order you need to know them for setting up and operating an outbound campaign.
2.1 Lexicon (Key Terms) - Basics
The first and single unit is a Record, a CDA (Campaign DAta). This is usually based on a Noun, a person, place or thing. This can be likened to a row of data in an Excel spreadsheet.
Every contact with a Record is called a Contact, a CCL (Campaign CaLl). This is a record of the interaction with the CDA.
Every CDA has two key fields. A Status (strCDA_X_Status) and a Count of Attempts to be in touch with that record (intCDA_X_NoOfAttempts).
- Status : strCDA_X_Status contains the last outcome used
- Attempts : intCDA_X_NoOfAttempts contains the total number of contacts (CCLs) had with this CDA.
When a volume of records are loaded en mass into a Form, they are given an initial Status of "Imported" and an initial number of Attempts as 0.
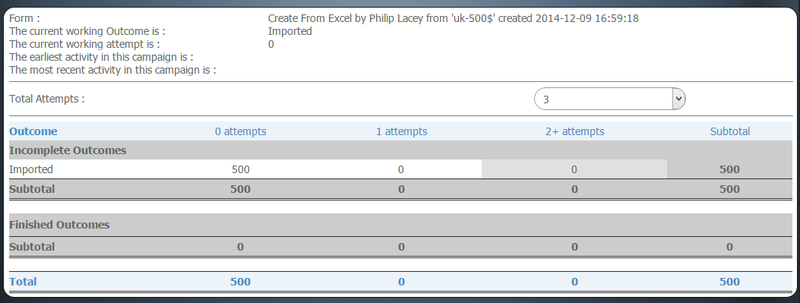
Records can be represented in a grid layout. On the vertical axis is the Status. On the horizontal axis is the number of Attempts.
As can be seen in the grid, we have 500 records with Status = Imported and Attempts = 0
We also have Status = Imported and Attempts = 1 which has 0 records in it.
Each one of these groups of Status and Attempts is called a Stack. Imagine the records, as record cards piled up in a big stack on a table.
2.2 Lexicon (Key Terms) - Operation - Management
bxp as a system must be told which records the users are to work on. The stacks to work on can be queued up. e.g.
- Work through all Status = Imported and Attempts = 0
- Then work through all Status = Imported and Attempts = 1
This is called the Queue. Queue Management is the process of selecting a number of stacks to work on.
To set the queue use Outbound_-_Queue_Management#Set_the_current_working_outcome
The top item in the list of the queue is the Current Working Outcome
To view what has been queued up to work on Outbound_-_Queue_Management#View_contact_queue
As an outcome is used they will increase the amount of items on the vertical axis.
2.3 Lexicon (Key Terms) - Operation - Processing
One the queue has been set, records will be distributed sequentially to users.
For a user to take a record they use Main Menu > Outbound Contact > My Data > Make an Outbound Contact > Choose the Form > They will be presented with the first record in the stack
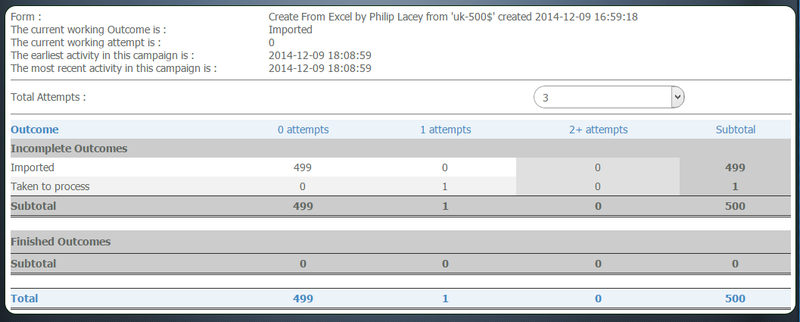
If you review the queue before an outcome has been chosen, a new Status and Attempt count will have appeared.
Taken to process is a system generated Status to flag that the record has been distributed. You can see that the Attempts have increased to 1.
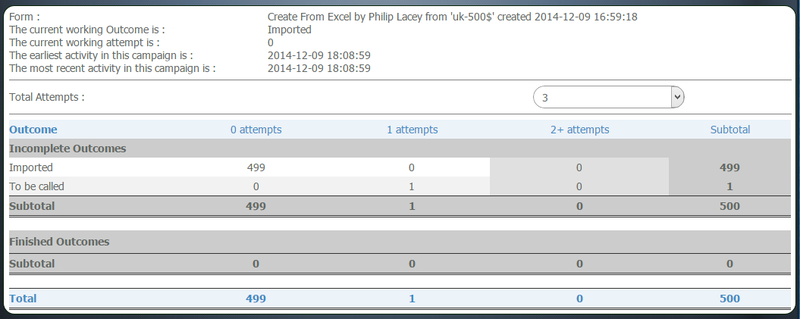
When a user chooses an outcome and updates the record they were working on, the record is said to return to the stack. In this example the outcome "To be called" was used.
2.4 Lexicon (Key Terms) - Operation - Outcomes
For any campaign records will need to be contacted again or not. This gives rise to outcomes being of one of two existences
- Finished
- Incomplete
Each outcome can be set individually to flag is the record Finished (Complete), i.e. we're not to bother queuing it up again, or is it Incomplete (Incomplete), it should be queued up again in the future.
Main Menu > Form Management > Outcome Manager > Outcome - Edit > Choose the Form > Choose the Outcome > Basic Details > Display Category
3 Queue Management functions
In the section Queue Management, the following functionality occurs:
- Set the current working outcome
- Set the current working outcome by period.
- Create custom contact group.
- Reset contact history.
- View contact queue.
- Add to contact queue.
- Clear contact queue.
3.1 Set the current working outcome
For outbound : Main Menu > Outbound Contact > Queue Management > Set Current Working Outcome For case management : Main Menu > Case Management > Queue Management > Set Current Working Outcome
- Here you can choose the current set of records to be managed.
- Choose the form
The following will be displayed on the screen:
- Form name: (Name)
- The current working Outcome is: (Outcome)
- The current working attempt is: (Number of attempts on this outcome)
- The earliest activity in this form is: (Date)
- The most recent activity in this form is: (Date)
- A list of Active Outcomes will be displayed on the screen and a list of Finished Outcomes will be displayed on the screen.
- In the Active Outcome section, hover the mouse over the number under first attempt.
- You will see that it is a clickable link.
- When you click on this number it will hand the next record in the system to the agent to complete.
3.2 Set the Current working outcome by Period
For outbound : Main Menu > Outbound Contact > Queue Management > Set Current Working Outcome by Period For case management : Main Menu > Case Management > Queue Management > Set Current Working Outcome by Period
- Here you can choose the current set of records to be managed during a certain period of time.
- Choose the dates.
- Choose the form.
The following will be displayed on the screen:
- Form name: (Name)
- The current working Outcome is: (Outcome)
- The current working attempt is: (Number of attempts on this outcome)
- The earliest activity in this form is: (Date)
- The most recent activity in this form is: (Date)
- A list of Active Outcomes will be displayed on the screen and a list of Finished Outcomes will be displayed on the screen for that period of time.
- In the Active Outcome section, hover the mouse over the number under first attempt.
- You will see that it is a clickable link.
- When you click on this number it will hand the next record in the system to the agent to complete.
3.3 Create custom contact group
For outbound : Main Menu > Outbound Contact > Queue Management > Create custom contact group For case management : Main Menu > Case Management > Queue Management > Create custom contact group
- Select the form.
- Create a name for this group in the text box.
- By supplying a name, this query group can be accessed quickly in the future.
- Choose the field names to be grouped from the dropdown menus, below the new group name.
- This will customise the group to exactly how you would like.
- Group the recipients.
- The group will now be saved for future use in the system.
3.4 Reset Contact History
For outbound : Main Menu > Outbound Contact > Queue Management > Reset Contact History For case management : Main Menu > Case Management > Queue Management > Reset Contact History
- Choose the form.
- You must be sure you wish to reset the contact attempts and last status.
- This action is irreversible once started.
- It will also reset all custom groups you may have created.
- Reset contact data.
3.5 View contact queue
For outbound : Main Menu > Outbound Contact > Queue Management > View contact queue For case management : Main Menu > Case Management > Queue Management > View contact queue
- Choose the form.
- The client record queue will be displayed.
- The following will be displayed on the screen:
- The Sequence ID
- The Outcome
- Attempts
- The number of records currently in the stack to be processed
3.6 Add to contact queue
For outbound : Main Menu > Outbound Contact > Queue Management > Add to contact queue For case management : Main Menu > Case Management > Queue Management > Add to contact queue
- Choose the form.
- Add outcomes to the contact queue.
- The following will be displayed on the screen:
- The form name
- The Outcome
- Attempts from
- Attempts to
- Attempts should always go from large to small.
- Attempts From should always be greater or equal to Attempts To
- Add the items.
3.7 Clear contact queue
For outbound : Main Menu > Outbound Contact > Queue Management > Clear contact queue For case management : Main Menu > Case Management > Queue Management > Clear contact queue
- Choose a form.
- Be sure that you want to clear the queue for this form.
- Confirm queue reset.
- Reset queue.


