Form - Outcome - Mail Merge
From All n One's bxp software Wixi
Contents
1 Overview
When an outcome is used there are scenarios when printed material, such as letters or forms are required to be printed. For this reason it is possible that for any outcome a printed letter template can be made available to the agent on the conclusion of the contact immediately for printing purposes.
This is accomplished using Communcations Centre templates, field mapping and custom developed HTML.
The following articles provide useful background material.
- [1] -- Field Notation
- [2] Understanding field mapping
- [3] -- field notation for bxp forms
- [4] Communications Centre templates
- [5] Writing HTML Emails
- [6] Web development tools
2 Step 1. - Tweak the browser
The real challenge in these solutions is going to be how the browser you're using allows printing. Each browser will add extra information to the header and footer of the page when it prints by default. You will need to tweak your browser to turn these off. There is no programmatic answer currently to turning these extras off as you can see discussed on StackOverflow [7]
So:
On Windows
- Internet Explorer: Go to File -> Page Setup, then set every drop-down in the Headers and Footers section to -Empty-. Click OK.
- Firefox: Go to File -> Page Setup, then click the Margins & Header/Footer tab. Set every header and footer to --blank-- and click OK.
- Opera: Go to Menu -> Print -> Print Options and untick the Print headers and footers checkbox.
- Chrome: Just click on the spanner and select print or do a ctrl+p and you'll get a print preview with an options menu on the left hand side. At the bottom of the list of options is a checkbox to turn headers and footers on or off.
On OSX
- Firefox: Go to File -> Print... (or hit Cmd+P), make sure the printing options are expanded (click the down arrow button next to the Printer if not), select Firefox from the third drop-down menu, then set all the Page Headers and Page Footers drop-downs to --blank--.P
- Safari: Go to File -> Print... (or hit Cmd+P), make sure the printing options are expanded (click the down arrow button next to the Printer if not), select Safari from the fourth drop-down menu, and untick Print headers and footers.P
If editing the browser settings is simply not an option, there is also a PDF download and print option built in, see Step 4 below.
3 Step 2. - Develop a template
Now the work can begin. You'll need to develop a HTML layout that represents your letter, form or material to be printed out. A white background usually saves a lot of ink from the printer.
A single page layout is relatively easily managed. When you come to step 4, you can tweak your layout and perform iterative tweaking to get it just right.
The best solution we have found is to start simple. Don't bother with font or colour or specific features / images. Construct the layout to get the basic elements on the page and the primary parts up and running.
The links and tools above should help you get this built, if not, please contact us and we can quote you to build it for you.
4 Step 2. - Integrate your field mapping using the -- notation
Now you have a layout, you'll probably want to dynamically fill content into the template. This is done using the -- notation and field mapping. You tweak your HTML until you get all your fields in there.
Again for simplicity purposes you may want to skip this step, but getting even the basics working for a morale boost is helpful we've found.
Go into the system and store it as a Communications Centre template.
5 Step 3. - Edit the outcome to use the template
Now we put the template in place on the outcome needed.
Edit the outcome and choose the template you've stored.
For best practice we have found that adding a template and playing with a dummy campaign is far less dangerous. 1. Copy the campaign. 2. Tweak the template to use the new campaign Id. 3. Add the outcome and attach the template. 4. Tweak the template till you're happy, then change the Id back and put into the live operational campaign.
This approach although adding development overhead stops dummy records and affecting reporting of a live campaign.
6 Step 4. - Test the solution
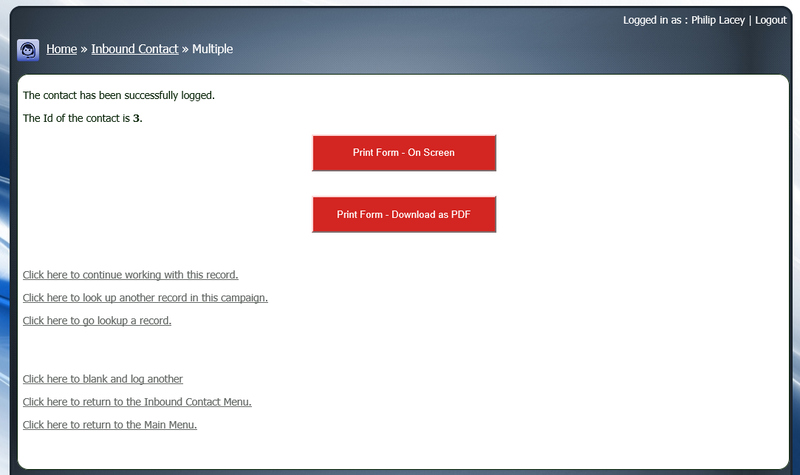
So to test. Add a record to the campaign. Choose the outcome and you should be presented with two big red buttons on screen to allow printing:
You will get a pop up window or the PDF open, which you can then print.
If using the "Print Form - On Screen", which is the best for testing, you can just refresh the pop up window that appears with the F5 function key as you tweak the HTML in another browser tab.
If you have a multi-page spanning document, or you can't tweak the browser settings for security or convenience reasons, then use the PDF version.
This process does take a lot of page printing to get right, especially if you're new to this. Feel free to get in touch with support@allnone.ie with a sample of what you're trying to achieve and we will happily quote to get your template up and working with advice on what will and won't work as appropriate.


