Create a User
From All n One's bxp software Wixi
Creating a user is the most common primary task for any user journey. The bxp software (bxp) billing model is based on live users.
Contents
1 Overview
There are a number of approaches to creating users but when just beginning with the system there is a logic progression.
The first job is to create a template user from which you can easily create other users.
With the template user in place you can mass upload users from an Excel spreadsheet or use the "copy user" function.
However we must begin with a single user.
2 Request New User
It is possible to create an entire user from scratch with completely custom settings and abilities. This is done using Main Menu > System Access management > User Setup Request > Request New User
The screen removes the "status" element of the user and the user will only every be set to "Pending". The account will have no content access and the user will not be able to log in until the status is changed from "Pending".
3 My Pending Requests
"My Pending Requests" gives the user who set up the request to view the users they have asked to be made live.
4 Creating a template user
There is a big separation within bxp between function and content. Read more here Function_Vs._Content
To add a user Main Menu > System Access Management ![]() > User Administration > Add User - Security Details Only
> User Administration > Add User - Security Details Only
When creating the user there are two major segments to page. The top half of the page is primary security details for the user. The second half is the modules and sectional groups which can be accessed.
4.1 Security Details
4.1.1 Block 1 - System Details
Every user in the bxp system must have a unique name. The firstname and surname of every user must be unique. The title and middle initial are optional for clarity purposes.
The password can be set to anything, as the user will be asked to change it on their first login. The easiest thing to do is to set the password to simply the word password. Making it as easy as possible to log in should be a primary consideration.
The status of the user will generally be set to live however there are a number of other statuses:
Not all account types are avilable to all systems.
- Account Disabled: This is a temporary status which prevents a user from logging in temporarily from failed passwords.
- Account Locked: This is a permanent status which prevents a user from logging in due to failed passwords or 90 day inactivity.
- Live: The standard user type.
- Pending: A requested new user waiting to be approved.
- Placeholder: A very simple user type with no module access but can log in. Used in Quality Assurance and simple form management.
- Retired: This is when a user is no longer needed on the system.
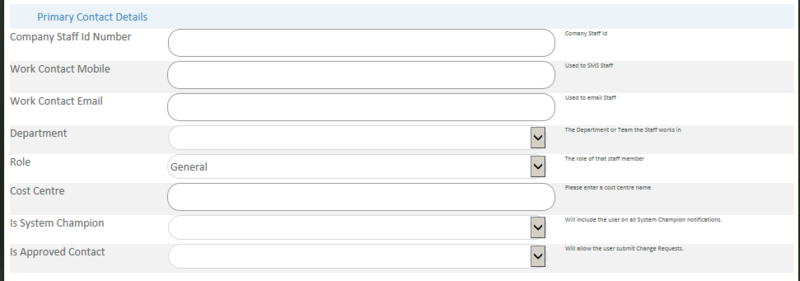
4.1.2 Block 2 - Primary Contact Details
Company Staff Id number is a useful field for inclusion of the users staff id in reports and data exports.
Work Contact Mobile. The system has the ability to send text messages. This field is mandatory and must contain 10 numbers. Put in a dummy number if needed e.g. 0870000000. If a user is having trouble having a contact number means the support team can get in touch quickly and directly.
Work Contact Email. This field is used for when the system sends notifications to users and also when the suppor team needs to be able to get in touch to be able to help.
Department. A user can only be a member of one department. Departments can be very useful for billing and grouped reporting. There are other mechanisms in bxp for being part of multiple teams Organogram_with_Group_Profiling. If you want to learn more about setting up a Departments System_Access_Management_-_Departments
Role. Like a department is a way to group users, role is a way of grouping users by job type. The system will always have a General role immedateily available futher roles can be managed through System Access Management.
Cost Centre. For billing purposes, it is possible to group users into Cost Centres for later accounting purposes.
4.1.3 Block 3 - Primary Security Details
This section is often filled in when advanced security options are required or integration with other toolss such as phone systems are required. For most users this section will remain blank.
IP Range: This field takes IP address(es) that the user is allowed to log in from.
External System Id: When using the bxp_API bxp_API, this is ther username of the user.
External System Key: When using the bxp_API bxp_API, this is the password of the user.
Force Inactive Logout: For advanced security set ups its possible to require the user to continually interact with the system to remain logged in. This is very useful for very insecure remachines in public areas or very security concious environments.
External Student Access: Student access means that if a user logs in from an IP address outside the IP addresses listed above they will still have enough access to continue self learning and study outside of the office. This is a live user with a special access type that eLearning is available outside the office but data access is only available when accessing from the IP Ranges above.
4.1.4 Block 4 - Primary VOIP Details
If user is integrating with a click to dial phone system or in an environment which allows the phone system to be controlled from within bxp, these settings allow the phone system to be informed from bxp. This is often referred to as "Click to Dial" technology.
Phone Server Technology: The phone system capable of accepting the request.
Server IP: The IP address of the phone server
Server Port: The port the phone server accepts the requests on.
User Extension: The extension of the user using the phone system
User PIN: This is the pin for this user in this extension
4.1.5 Block 5 - Interface Options
Interface bars allow bxp to be completely customised. More information on these is available from Interface_Bars
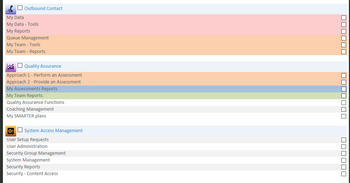
4.2 Module and Sectional Groups
Each module that is available in your system will be listed here. Each module has a tick box to the left of the title which must be ticketd.
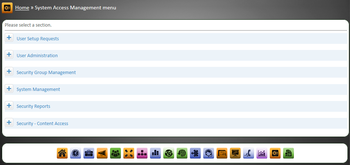
Using System Access Management as an example, there are six sections to the module. When you tick the section you give access to the user to functionality of that module.
To provide a guideline for a System Champion when setting up the template users there is a simple colour system to identify common functionality by general roles:
- Light red: these would be basic functionality users, perfect for a general data entry user
- Light orange: these would be a team leader type functionaltiy and reporting
- Light green: these would be suited for general reporting roles on all users
- Light blue: these could be potential dangerous functions such as deleting data and are suitable only for System Champions or equivalent
5 Notes
1. Although creating users is straight forward, it may be easier to "Copy" a user. As this will tick all the same sections and grant permissions identical to the copied user.
2. For mass user loading, BE allows a list of users to be uploaded and using an existing user as a template create as many users as you need.
3. Often our users will "Add" a user using "User Setup Requests" and "Request New user". This user will not be live, but can be edited to change their status from "Pending" to "Live"
6 Troubleshooting
The most common trouble comes from spaces. If you copy and paste in a name, please check that you haven't got a space at the end of the Firstname or the Surname.
Passwords are often forgotten. The most useful approach is to reset the password to "password" and the system will request the user to update their password on next login.


