Bxp Click to Dial integration with 3CX
Contents
1 Overview
The challenge was to allow a button press on a bxp script to cause an automated dial to happen.
This would lead to Preview and Progressive Dialler functionality to be built into bxp if the agent had access to a 3CX switch at their current location.
As the functionality allows for different agents to be on different sites, using different phone technologies, it means multisite use of outbound contact can be managed through bxp, without dependence on any one form of phone technology or one phone switch.
2 Sample network setup
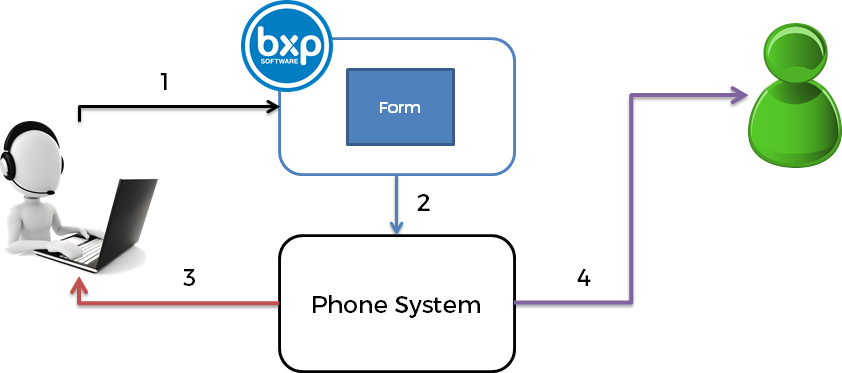
The network configuration would look something similar to:
- Agent logged in and properly set up on bxp, presses the “Make Call” button. That request is passed to bxp to fulfil
- bxp posts a request to the 3CX phone system
- The 3CX phone system calls the agent requested
- The 3CX phone system calls the customer
2.1 Notes
All bxp requests will come our public addresses X and X. This IP will have to be allowed permission to make requests of the 3CX. The port on which bxp will make the request can be specified on a user by user basis.
Outbound dialling rules will be adhered to, so stripping digits for outbound dialling codes can also be included in the config set. The function in bxp simply is passing the number to be dialled to the phone system along with the agent to send it to.
3 Sample bxp setup
3.1 Add the VoIP server configurations to the user
Edit the user, but now there is a new section which allows the 3CX details to be added.
Primary VoIP Details
- Phone Server Technology
- 3CX – This is currently the only option but other options such as Skype or other phone providers will follow (primarily on demand)
- The external IP address of the phone server, where a request can be posted to
- The extension of the user
- The 3CX MyPhone PIN of the user
3.2 Add the JavaScript to enable the use of the 3CX
The following can be added to the Introduction or the “Dial Out” Instructions
<script type='text/javascript' language='javascript' src='../../../library/javascript/fn_javascript_3cx.js'></script>
<input type='button' name='btnPBX_X' id='btnPBX_X' class='Master_BigRed_Button' style='width:500px;' value='Call Number' onClick=fn_3CX_MakeCall(document.getElementById('strCDA_41_field_2_5').value) />
<input type='text' name='strVOIP_Result' id='strVOIP_Result' value='' />
The library call in the script tags, adds the formatting of the 3CX query details.
- The input button is formatted to be big and red and have the title “Call Number”.
- The remainder of the button, states which field to make the phone call on.
The results of the function can be optionally displayed in the strVOIP_Result text box for troubleshooting purposes.
3.3 Customise the JavaScript to deliver the required functions
The primary function of the page is the fn_3CX_MakeCall function. Passing any number to this function, is what will be dialled.
In the background, if VoIP details are available for the user, they are placed in hidden fields in the source of the page to remove the need to add them to all campaigns.
The following are added dynamically when available.
<input type="hidden" name="strClient_VOIP_BEProtocol" id="strClient_VOIP_BEProtocol" value="https://" />
<input type="hidden" name="strClient_VOIP_BESystem" id="strClient_VOIP_BESystem" value="ww3.allnone.ie" />
<input type="hidden" name="strClient_VOIP_BEClient" id="strClient_VOIP_BEClient" value="client_demo" />
<input type="hidden" name="strClient_VOIP_ServerIP" id="strClient_VOIP_ServerIP" value="123.123.123.123" />
<input type="hidden" name="strClient_VOIP_ServerPort" id="strClient_VOIP_ServerPort" value="5000" />
<input type="hidden" name="strClient_VOIP_Extension" id="strClient_VOIP_Extension" value="1100" />
<input type="hidden" name="strClient_VOIP_PIN" id="strClient_VOIP_PIN" value="1111" />


